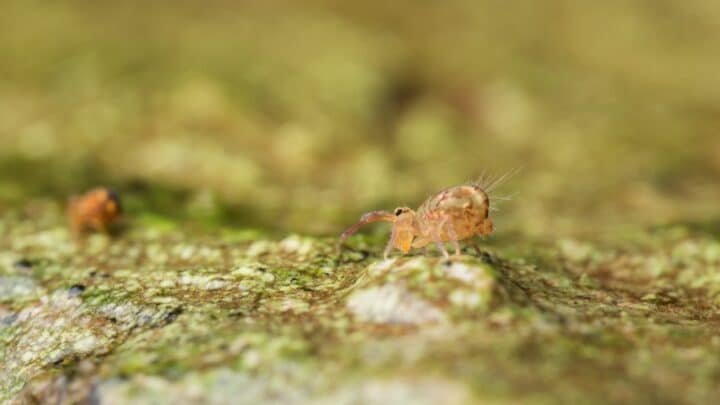
Springtails are small insects that are used to feed small mammals, fish, and other insectivores. Some of the insectivores they feed include – frogs, moles, hedgehogs, shrews, shrimp, geckos, and the list goes on.
Due to them being detritivores, they eat dead fungus, bacteria, and organic materials. Springtails are known as the clean-up crew.
How to Breed Springtails?
To breed springtails, you need 2 airtight containers, at least 50 springtails, a substrate, food, water, and a spray bottle. Place your chosen substrate on the bottom of the container, making sure it is moist. Place the springtails inside, feed them and spray the substrate on the sides of the container. When the food supply goes low, sprinkle in some more.
1. Appropriate Container for Breeding
The breeding container must have an air-tight seal with six quarts size at least.
I use a small plastic tote (shoebox size) that I got from a dollar store. You should get two containers, one for breeding and one to transfer them into when they’re ready to be moved.
You can also use deli containers, reusable plastic containers for food storage, culture containers, etc. Ideally, you’d want to see into the container without having to remove the lid.
It’s important to remember you’re not breeding one springtail, you’re breeding hundreds or thousands while they are very small and usually don’t grow above 4mm.
You still need a container big enough to hold the springtails and their breeding medium (substrate) and food. You also want to make sure the moisture stays in the container.
2. Breeding Mediums (Substrate)
The breeding medium is what the springtails will breed and live on.
The most popular breeding medium used are charcoal. You can use activated charcoal, lump wood charcoal but never BBQ charcoal (briquets).
Peat moss, potting soil, and coco fiber can also be used instead. Before you can place your chosen medium in the container, it has to be prepared.
Activated Charcoal
Is the easiest to work with. Most pieces are small and all you need to do is place them on the bottom and add some water, so they are moist.
Lump Wood Charcoal
Needs to be broken up into smaller pieces then placed in the container and water added for moisture.
Peat Moss
Boil any sort of peat moss for about an hour on medium heat in a big cooking pot on the stovetop. This sterilizes it and it will automatically adjust the pH to what it is supposed to be.
After an hour of boiling, remove the peat moss from the pan and allow it to cool to room temperature. Rinse your peat moss under running water after it has cooled.
Drain all the water except enough to keep it moist. Now you’ll need to fill your container with around 2 inches of peat moss.
Potting Soil
Fill a microwave or oven-safe bowl or container with any type of bagged potting soil. Now you may either bake the soil for 20 minutes at 350°F or microwave it for 2-3 minutes.
Take caution while removing the soil, since both the container and the dirt will be quite hot! Make sure the soil cools down to room temperature first before using.
Fill your plastic container with 2 inches of potting soil.
Coconut Fiber
Fill your expanding coconut fiber with just enough water to make it wet. Fill your container with roughly 2 inches of coconut fiber.
You can add charcoal to any of these three mediums.
3. Add the Springtails to the Container for Breeding
If you’re just starting out and do not have any springtails, you can order them online. You usually get about a hundred of them.
Once you have your springtails, gently shake and dump them into the prepared container.
4. Feeding the Springtails
You can feed springtail grains such as rice, couscous, flaked fish food, even cooked pasta. You will also need to sprinkle baker’s yeast in the container.
Don’t overfeed your springtails. If you add too much food, it will spoil, and the smell will be awful.
You probably won’t be able to retrieve the spoiled food, so just keep an eye on it and add to it when needed.
The yeast can be hard to see in the container, so sprinkle a little every three days or so to make sure there is always some in the container.
Every few days, spray a little water on the sides of the container and the substrate to keep it moist if you don’t want to soak it, so be cautious.
5. Transferring the Springtails to a New Container
Back in the first section, I told you about containers for breeding and told you to get two. One container for breeding and one for transferring.
It’ll usually be around a month before you can see an abundance of springtails. When they do start to appear, you will want to begin transferring them out so you can use them.
Most people only breed springtails for two reasons: one to feed pets and the other to sell them.
To transfer them from one container to another, fill the container they are in with water and pour them into the new container. Try not to get a lot of water in the new container.
You can dump out most f the water from the original container after the transfer. You won’t get them all in one transfer.
Some may not be ready, and others may be hiding, so it will take a couple of tries to complete this process.
Frequently Asked Questions About Breeding Springtails
How Often do Springtails Breed and How Many Babies Each Time?
Springtails breed four times a year and have about 200 babies each time for a total of 800 a year.
Can You Keep Springtails as a Pet?
Since they’re very easy to care for, you can definitely keep them as pets. You must make sure their bedding is moist and feed them twice a week or when you notice they are getting low on food.
Conclusion
Springtails play an essential role in keeping dead organic matter, fungus, and bacteria out of small mammals, fish, insects, and numerous other animal habitats.
They also serve as the main food source for several small animals, such as hedgehogs, and moon rats, as well as frogs, and crustaceans.
Breeding springtails is easy to do and it’s affordable.